The day the devs decided not to make an H game
Making a toolkit for a game engine (technical)
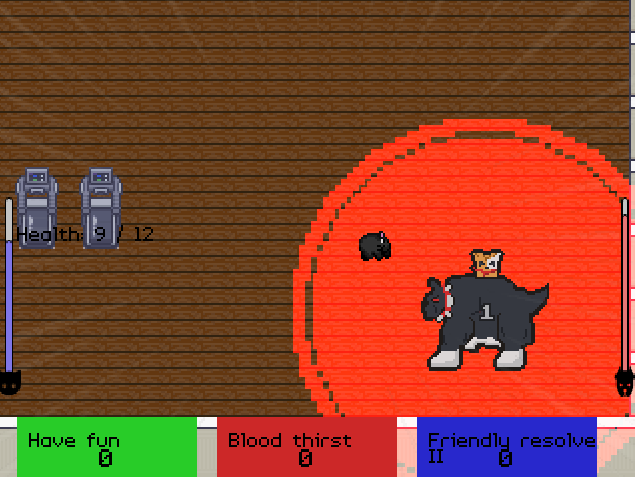
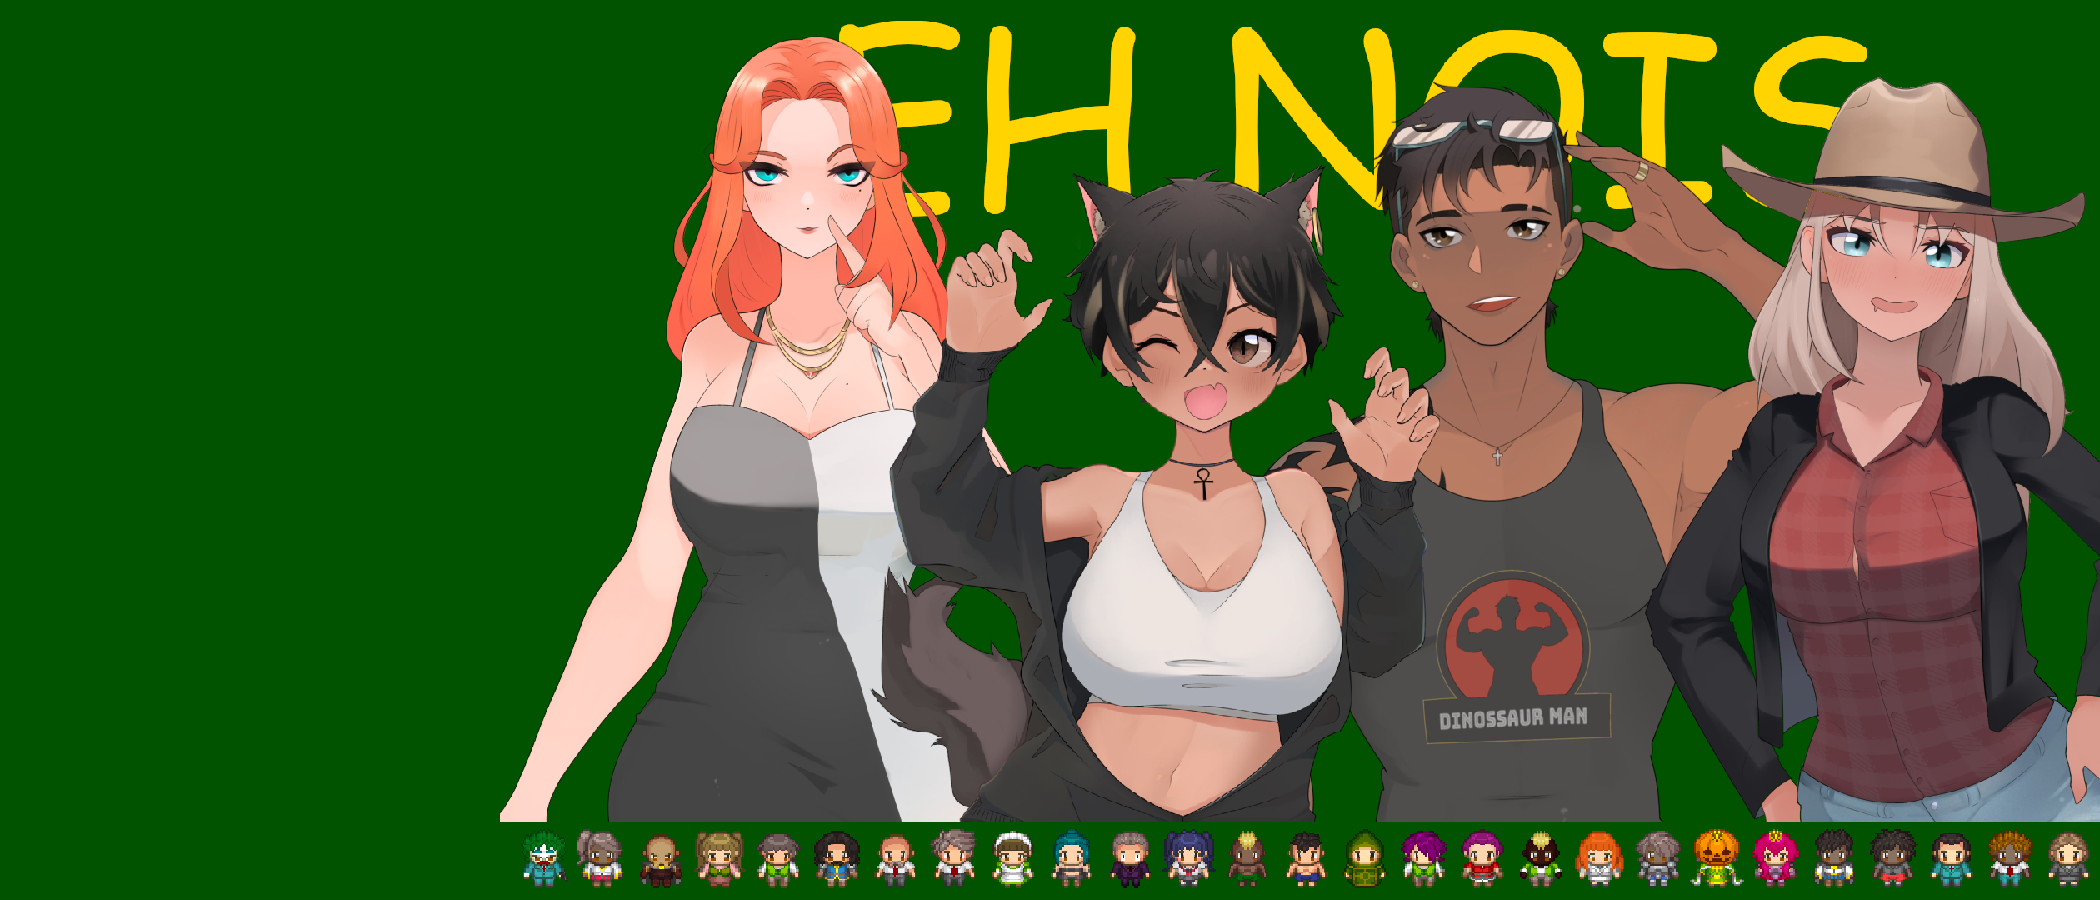
If you are a developer, you have probably felt this at least once: "Holy frick! I'm a programming god!" This feeling usually comes when either A) You have spent hours coding and written 0 or few bugs, or B) When you make smart design decisions. I want to share the latter on our latest game, Kotto and Kokone's Ultra Adventure - The day the devs decided not to make an H game as a commemoration for it getting indexed!
Background
Toolkit
Toolkits are usually big projects targeted at facilitating the creation of desktop applications and user interfaces in general. They provide tools (especially in the form of widgets) that abstract the placement of objects (where should things be), appearance (how they look), and reactivity (clicking, hovering, etc.). If you've hung out in the Open Source community for a while, you might be aware of toolkits such as wxWidgets, Qt, and GTK.

 - Wikipedia")
Solarus Game Engine
Solarus is an Open Source game engine that allows you to create ARPGs. It uses SDL2 as a rendering backend, allowing games to run on multiple platforms (even the Nintendo Switch, read the next line to see why this is so cool). More specifically, it implements and is inspired by many classic Zelda games. It comes with dialog boxes, enemies, NPCs, multi-language support, and much more...

But you know something that wasn't very common in classic Zelda games? Menus and UIs. This is where saltk (our toolkit) comes into play. Let me be clear, implementing a single HUD is not difficult in Solarus, but it can be limiting, and over time, work might pile up. This is why we felt the need to create saltk.
For this document, it's important to understand three APIs that Solarus gives us: sol.surface (used for drawing images on the screen), sol.video (a special surface that is the actual game window), and sol.menu (used for dynamically displaying surfaces). It's also important to understand that by default, Solarus renders everything in 320x240 (this value is adjustable), but higher resolution images could be tricky to implement.t.
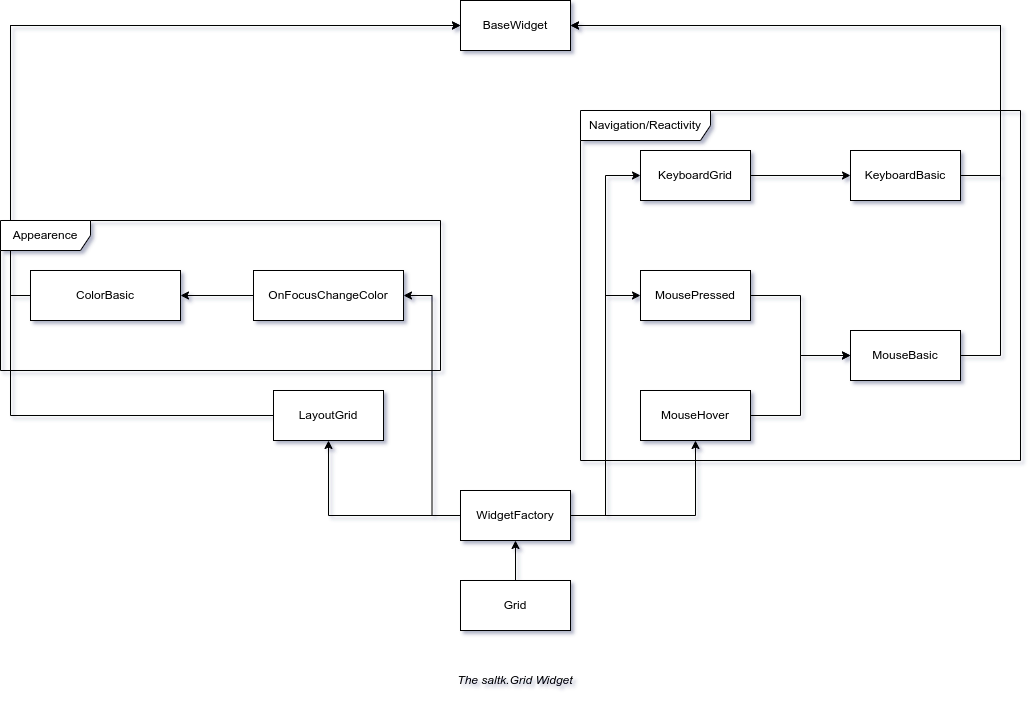
Architecture
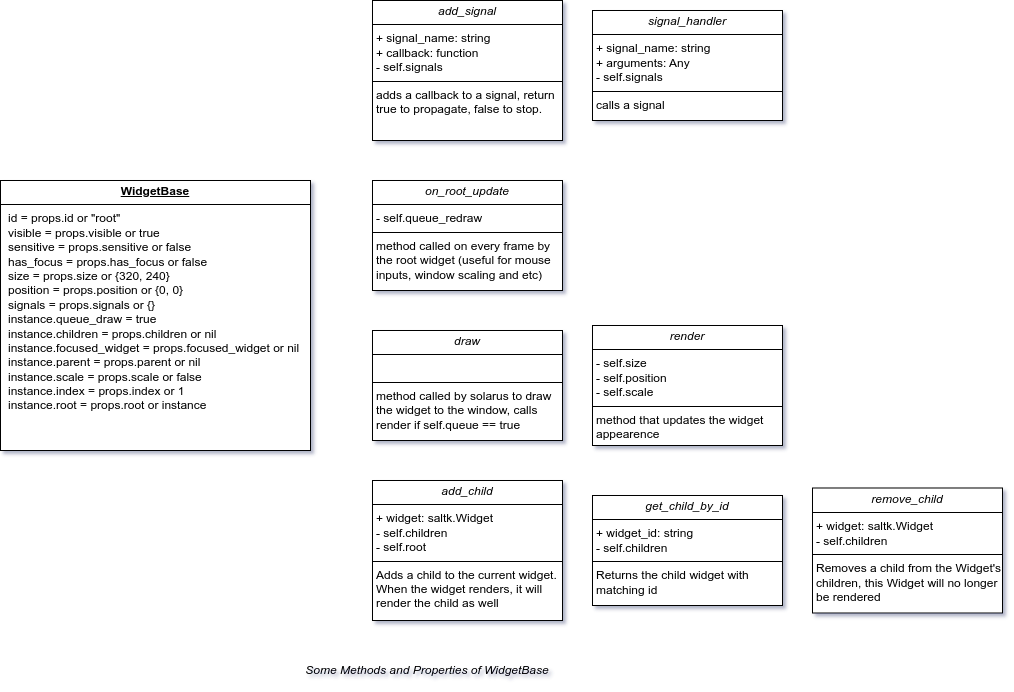
WidgetBase is the most primitive form of an object implemented in saltk. It implements things that will be used by all widgets, most importantly, it creates a basic structure for allowing dynamic rendering of widgets and creates signals and signal propagation.
What is dynamic rendering?
Rendering can be quite computationally expensive; as a game dev, you are probably aware of the fact that game engines usually only render things that can be seen by the player. The same concept sort of applies for UIs and toolkits. Having to recalculate positions, sizes, and colors for all the widgets can scale up quite rapidly, especially in our case since we will be creating and destroying quite a few sol.surfaces, since we aren't working on a lower level.
Dynamic rendering is quite simple in practice and quite smart in that sense. Basically, we only do these calculations when needed (when queue_redraw is set to true). This comes in handy in situations such as the OnFocusChangeColor interface. Basically, this interface implements a signal that if the widget has gained focus, it should redraw because OnFocus -> It will change its background color.

It's similarly useful if you change the position of a widget and all its child widgets. If there's an update to the parent widget, then queue_draw all the children widgets too.
What is signal propagation?
Especially in toolkits, you want the developer to have a clear, readable, and tight way of handling events. For example, imagine you want to create a button that says "Hello World!" to the Console/stdout whenever you press it. In a first implementation, you might not really care about the appearance of the button but rather the fact that it does what you want it to do. But wouldn't it be nice if you could have some pretty hover and clicking animations while doing that? That's what toolkits also do!
This ties neatly to the code presented above. If the widget updates its colors when it gains focus, then by calling the "focused" signal when hovering it with our mouse, we can update the color while also allowing the developer to add their own custom signals using the "add_signal("focused", function ... )" method!

In some cases, however, you might not want an event to propagate. For example, let's say that when pressing the "tab" key on your keyboard, you move the focus to the next widget in your window (especially useful in forms), so you code that; but now you want that if the user presses "tab" on the "Submit" button instead of going to the next widget, it moves to an obligatory field the user has forgotten to type. If events always propagate, you would be forced to send the user first to the widget before the one they forgot to type, to then let the default behavior of selecting the next one take over and place it in the correct one. Instead, it's more useful to just say "focus the widget the user forgot to type and do not do your default behavior"; this is equivalent to adding a signal that returns true.
The Widget Factory
The final piece of our puzzle is the widget factory. As the name suggests, this is a function/class that creates new widgets, connecting the dots depending on the specifics needed. In saltk, for example, there are a few "default" ways a widget can get focus: by using the arrow keys (KeyboardBasic interface) and by hovering (MouseHover interface). If we want our widget to change color when we hover it with the mouse, we can do that through the WidgetFactory

Similarly, we can change its color if we hover it using the arrow keys.

Or both!

Extra: Displaying high resolution images in solarus
Now we have everything needed to create awesome menus, but how does that impact drawing high-resolution images in Solarus?
As mentioned before, one of the design limitations of Solarus is that objects of the game are by default rendered in a fixed resolution (such as 320x240), then upscaled to match the user's screen. This works great if you are only using small sprites, but not so great if you plan on also displaying high-resolution images such as our characters during dialog scenes.
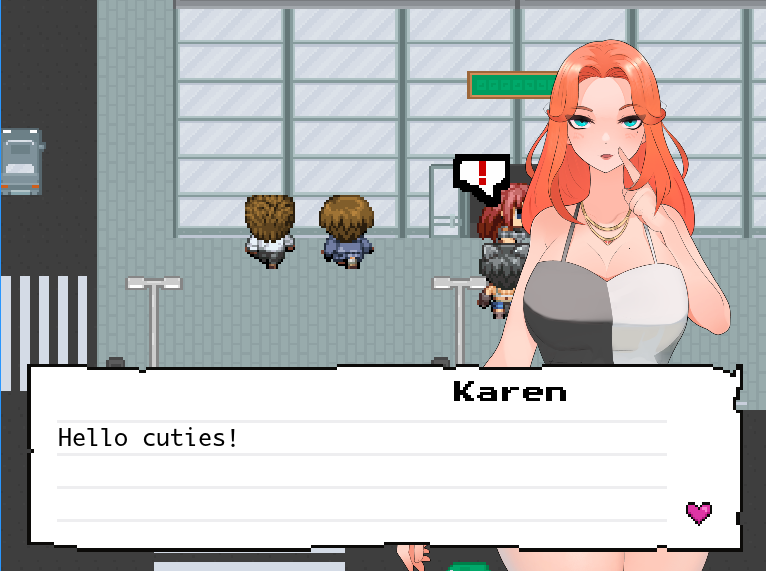
Here's what we did:
First, make it so that when setting a size and position to a widget, do not place it directly, but rather translate the coordinates into window coordinates if requested:
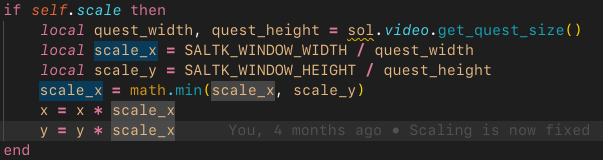
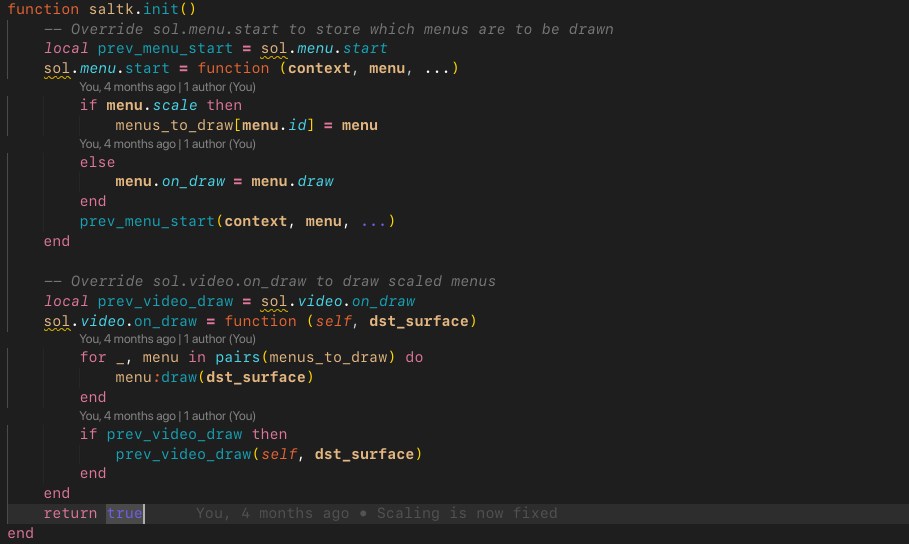
Then, override the sol.menu.start and sol.menu.stop functions from Solarus to first check if the menu ought to be scaled. If yes, then the root widget will be drawn directly into the window through sol.video, then proceed as usual:
Then we just have to populate it with widgets like this:

-- Create a root widget without any image (transparent)
dialog_box = saltk.Image.new({id="root_new_dialog_box",
    size={320,240}, scale=true, -- Important for hd, only useful for the root widget
    position = {0,0},
    special_scale=2,
    sensitive=true, has_focus=true
})
-- Add out HD character image
local character_image = saltk.Image.new({id="character_image",
     size={190, 240}, position = {160,10},
     special_scale=1, image="characters/kokone_sora/aa.png"
})
dialog_box:add_child(character_image)
-- Add our dialog box
local box = saltk.Image.new({id="box",
     size={320,105}, position = {10,150},
     crop={0,0,220,60}, special_scale=1, -- Useful for cropping, different than scale=true
     image="hud/dialog_box.png"
})
-- We will now add stuff inside the text box
-- First the heart in the bottom corner
local dialog_box_end_sprite = saltk.Sprite.new({id="dialog_box_end_sprite",
    size={16,16}, position = {275,60}, -- Position is relative to parent widget
    special_scale=1, image="hud/dialog_box_message_end"
})
box:add_child(dialog_box_end_sprite)
-- Then the character name
local character_name = saltk.Text.new({id="character_name",
    size={300,80}, position = {180,10},
    special_scale=1, text="Kokone Sora",
    font="PressStart2P-Regular", font_size=10 })
box:add_child(character_name)
-- Add the text
local lines = {}
for i=1, nb_visible_lines do -- This is not needed anymore, as saltk.Text supports text wrapping now, but useful
   lines[i] = saltk.Text.new({id="line_" .. i,
        size={300,80}, position = {14,14 + (i*14)},
        special_scale=1, text="",
        font="Osaka Regular-Mono", font_size=12,
        rendering_mode="antialiasing"
    })
    box:add_child(lines[i])
end
-- Add box with everything to the root
dialog_box:add_child(box)
-- Close when spacebar is pressed
dialog_box:add_signal("key_pressed", function(dialog_box, key)
    if key == "space" then
        sol.menu.stop(dialog_box)
        return true
    end
end)
return dialog_box
-- You can now call sol.menu.start(dialog_box)
This code may seem scary for someone who has never worked with toolkits before, but it will look awfully familiar to anyone who has used GTK and Qt. Essentially, we are creating widgets and nesting one inside the other. If the first widget (also known as the root widget) has the property scale set to true, then everything will behave as if working in an HD screen.
Feel free to ask questions or write comments down below!
Sauce code (to be updated): https://gitlab.com/zitrussaft1/saltk
Leave a comment
Log in with itch.io to leave a comment.